What is oil ground:
Oil ground is a primer that can be applied to a painting surface before painting. It is used to add a protective layer between your painting surface and your paint. A good oil ground, also called oil primer, seals the surface of the canvas and helps prevent oil paint from absorbing into the canvas.
Why I use oil ground:
- My paintings will last longer- Oil paint adheres onto oil ground better than on a canvas, and oil ground sticks to canvas better than oil paint. Oil paint applied straight onto canvas is more likely to peel or crack after it has dried, been cleaned or exposed to extreme temperatures.
- My paintings will look better- Oil ground is less absorbent that canvas. By painting on top of an oil ground, oil paint is less likely to "sink in" or result in dull spots in the painting from absorbing into the canvas.
- It is easier to make changes to a painting- As long as the oil paint is still wet, it is much easier to remove or wipe off paint from on top of an oil ground than on a bare canvas.
- It feels nice to paint on- The smoother surface allows my paint strokes flow more easily. It is a more pleasant painting experience.
How to apply oil ground to a canvas:

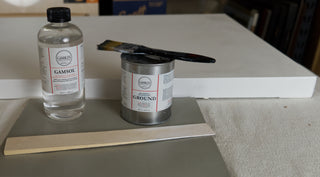
Step 1: Thoroughly mix the oil ground in the can, this can be done using a mixing stick or a palette knife. When you open the can, the oil ground will look very hard and unusable. Mixing thoroughly will return the ground to a usable consistency. If you are happy with the consistency, you can use the oil ground straight out of the can and move to step 3. If you would like to thin it down a bit, please see step 2
 Step 2(Optional): To thin the oil ground, a small amount of gamsol(no more than 5% gamsol to amount of oil ground) can be added and mixed thoroughly into the ground. I like to mix my gamsol and oil ground together on a disposable paper palette for easy clean up.
 Step 3: Apply a pile of oil ground onto the canvas, then spread the oil ground into a thin, even layer across the canvas using a flexible hand scraper tool. Take your time with this step to avoid creating different areas of thinness or thickness of oil ground on your canvas. This can result in uneven absorbency levels across your canvas, which in turn could cause your finished painting to have patchy looking areas where the paint absorbed inconsistently in some areas of the canvas.
 Step 4: If you are painting on a raised stretched canvas, don't forget to apply the oil ground to the sides of the canvas as well as the front. The easiest way I have found to do this is to start at one corner and work my way around the canvas until I get back to that corner. I apply the ground using the scraper, I position the scraper at the bottom of the canvas as close to the table as I can get and then scrape the ground up toward the ceiling. Once again, take your time and try to achieve an even layer.
 Step 5: While the oil ground is still wet, use a soft, flat paint brush to lightly smooth out the oil ground across the entire canvas. Keep your brush strokes as light as you can while still managing to smooth out lines or bumps created when applying the ground with the scraper.
Step 6: Once you are confident that you have smoothed out the oil ground across the canvas, you are done! It is recommended to wait at least 4 days to allow the oil ground to dry before starting your painting.

